Key Lime Meringue Pie
 I don't usually make pies - cooking for just two means that a 9-inch pie becomes a extra 9-inches on the waist after that initial slice.
Me: Just a tiny bite more
You: Would hate for it to go to waste
Me: We gotta finish it before the weekend's over
You: Well it's three-quarters gone, we might as well eat the rest
And so forth. Soon, you're eating pie for breakfast, lunch and dinner. For men, that's fine, for us girls... not so much.
So I was, of course, thrilled to have a chance to bake some pies for the L.A. Foodbloggers Potluck/BBQ (the first of many, I hope!). Since we have so many great fruits in season right now, I settled on Key lime and cherry.
My Key lime pie is a hodge-podge of a couple different pie recipes: the graham cracker crust and the key lime filling are adapted from Gourmet magazine, the meringue topping adapted from Food & Wine's grapefruit caramel meringue pie recipe (which is also an amazing pie, but takes about 2 days to prepare).
So here we go...
Key Lime Meringue Pie: A Photographic Journey
Graham Cracker Crust
- 9 graham crackers, crushed in a food processor
- 2 tablespoons sugar
- 5 tablespoons unsalted butter, melted
Key Lime Filling
- 1 (14-oz) can sweetened condensed milk
- 4 large egg yolks
- 1/2 cup plus 2 tablespoons fresh Key lime juice (from about 20-30 Key limes)
Twenty-seven limes, 21 minutes and a severe case of carpal tunnel later, I had produced...
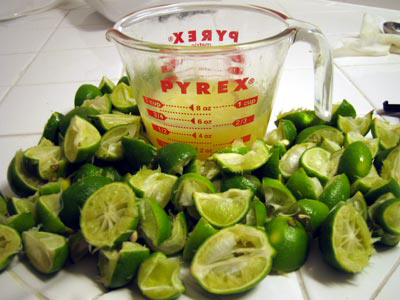
...a whopping 1/2 cup and two tablespoons fresh-squeezed key lime juice, the exact amount I needed. My foodblogging friends gave me a great tip: roll the limes against the counter before cutting them open - it helps release the juice and make for easier squeezing.
Whisk together the condensed milk and yolks in a bowl until combined well. Now that you have the juice out of the limes, add juice and whisk until combined well (mixture will thicken slightly). Pour filling into crust and bake in the middle of the oven 15 minutes. Cool pie completely on rack, then chill, covered, at least 8 hours.
Be sure to cover the pie with foil, not plastic wrap - the plastic clings to the top and ruins the look of the pie when you try to take it off. Hence, why I added the meringue topping in the first place!!
Meringue topping
- 6 egg whites
- 1 cup sugar
In case you haven't made meringue before, it's a piece of cake with a KitchenAid mixer. The key thing is to know what it should look like when it's done. You want it to be thick and stiff, so it hold peaks easily.

Spread the meringue topping over the pie and refrigerate until ready to serve.
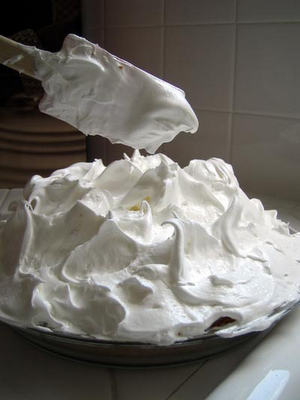
Once you're ready to eat it, the pyrotechnic fun begins. For anyone who knows me, I'm always looking for an excuse to set food on fire. And meringue makes a great excuse! Light up your torch and go at it. No torch? You're missing out on all the fun: just put it under the broiler for a couple minutes.

Mmmm. It turned out quite good if I do say so myself. Tarty, limey, refreshing and not too sweet. In case you're wondering, "Hey, how come it's not green?," that's because Key limes produce a yellow-ish juice, not green. Any Key lime pie you've had that's green is either not from real Key limes, or it's been colored with green food coloring. Which is fine too... but if you're gonna go green, why not go purple and really confuse people?
Next up: Cherry Pie Massacre


